#freeburn2 – Open Source CO2 Laser Cutter

1657

http://openbuilds.org/builds/openbuilds-freeburn-2-mini-v-slot-co2-laser-40-50w.1657/

Now that FreeBurn-1 is up and running (see http://openbuilds.com/builds/openbuilds-freeburn-1-v-slot-co2-laser-60-100w.1001/)

I think it’s time to start working on my 4th iteration of a lasercutter design: FreeBurn-2-Mini

The Mini is a much smaller (900x650mm desktop footprint) machine that offers approximately 600x400mm work area, with a 40-50w tube (larger tubes need a longer body – so you would be better off building a FreeBurn-1 style machine if you want higher wattage)

Furthermore, the Mini will use a lot more lasercut/waterjetted metal sheeting (yes I hear you – but trust me every big town has a shop just hunt them down) with some strategic bends. Also, a BIG challenge is to make the whole design be bolt-together. If I could use spot welds my job would be a lot easier but then that would make reproducing the machine / packing as a kit / later disassembly impossible – and I’m not prepared to compromise those. No the FreeBurn-2 Mini will need nothing but a few bolts to assemble!

The sheetmetal frame will be easier to align than a FreeBurn-v1


Raspberry Pi Zero + Grbl + TMC2660 Controller – Update

Wow, I have to admit the community has overwhelmed me with their support over the last two days!

Since my posts on Google Plus on Friday, a lot of people has stepped forward offering their help and support.
I’ve received donations from:

  • Samer Najia – $50
  • Casey Coward – $5
  • Brain Bland – $10
  • Klemen Zivkovic – $10
  • Frankie Graffagnino – $25
  • James K Rivera – $10
  • OpenBuilds Part Store – $250

After paypal’s fees that means I have $343 left to start ordering parts!

Since most of the BOM consists of parts from my parts/circuits library, I don’t need to wait for the full PCB design to be complete to start ordering.

So will get that done this week. Local tax laws means I cannot just spend straight out of paypal like my US buddies can, so it takes couple of days extra to first withdraw it to my South African bank account, additional fees as well…

In the meantime, work on the design has continued:

First I had to draw up a Eagle LBR for the Pi Zero (Seems I was the first oke to make a shield for it hehehe) – I posted it to the Raspberry Pi Forum on Saturday.  (today there are more results, on Saturday morning when I searched I couldn’t find any)

Next, I started the process of consolidating the “building blocks” onto a single board:

So far on the board from top left to bottom right:

  • LM2596-5   %v 3A Switchmode Buck converter
  • 3 x TMC2660 Stepper Drivers with 3.5mm pluggable screw terminals
  • 3 x Endstops (pluggable 3.5mm terminals)
  • 1 x Z-Probe connector (3,5mm pluggable)
  • Pullup resistors and reverse baised diodes for the endstops/probe to allow you to use any NPN type Inductive, or Normally Open switch as a endstop/probe.  The onboard circuitry filters noise and blocks high voltage from the MCU
  • Raspberry Pi Zero
  • Atmega328 running Grbl
  • Screw terminals for Spindle Enable, PWM signals

grblpi-zero.png

Keep the donations coming, there’s always more projects that could use funding

Paypal:
https://www.paypal.com/cgi-bin/webscr?cmd=_s-xclick&hosted_button_id=KC92Q2BJL4S7U&source=url

Raspberry Pi Zero, Grbl All in One CNC Controller

So, yesterday the Raspberry Pi Foundation, released a new Pi!  The Pi Zero!

Raspberry_Pi_Zero

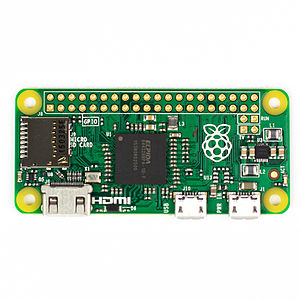
So what happens when I am bored, sitting in a guesthouse, armed with Eagle, a crazy idea, a community encouraging me, and a handful of parts in my parts bin just itching to be used?   Mixed in with a passion for CNC? Yip exactly that what you were just thinking!

Couple of points to plan in…

USB Hub

So, first off: USB.  The Pi Zero is great right?  Except it doesnt come with proper USB Ports ):  Sucks right?

So first problem I want to tackle is a board on top, or on the size, with a 4 port USB hub.  To connect to the Pi Zero, instead of a small cable, I want to have a small PCB soldered on at 90 deg to the main board, holding a PCB mount USB Micro socket:  I just received a few hundred of these from Aliexpress a few weeks back….
usb plug pcb

This allows a clean, slot on adapter – no messy wires.

Next, for the USB circuit, I will go with my old trusty building block circuit, the TI TUSB2046: (already open sourced it on my Github, here:  https://github.com/openhardwarecoza/OPBS-PROJECT_ALPHA/tree/master/Research/Modular%20Tests/USB-Hub)

Grbl and TinyG – yes both

So what else does a RPI ZERO CNC CONTROLLER need?  Grbl! The old easy favourite, although, John Lauer of http://chilipeppr.com/tinyg just asked me on Google Plus (thread on https://plus.google.com/+PetervanderWalt/posts/dtGv42CSVxV) if I can make it work with TinyG too and I said, sure, why not! So two versions in the pipeline!

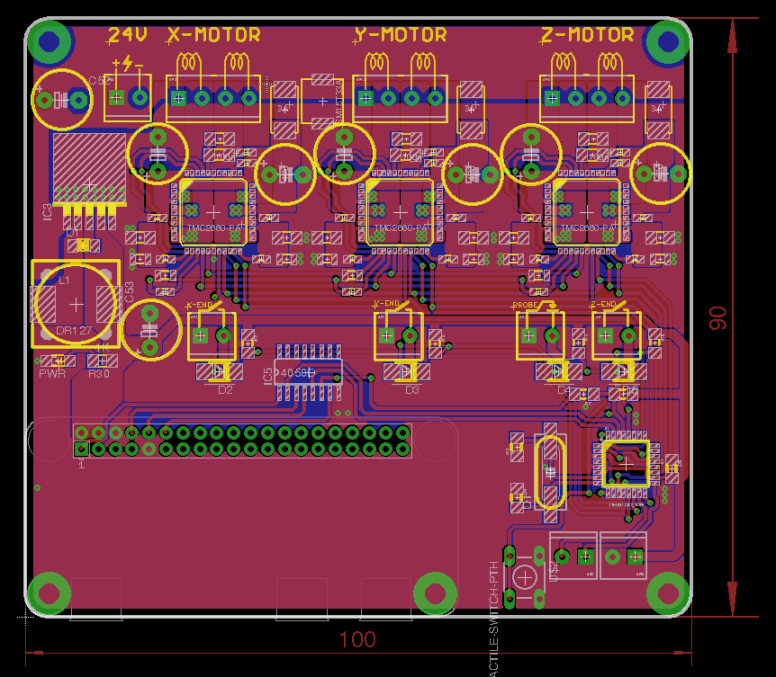
High powered Stepper Driver stage

I’m going to need a good stepper driver setup.  And again, I already have a building block in my github from a design I was working on before the Zero came out:  The TMC2660, capable of 4A per motor, 256 microstep!  https://github.com/openhardwarecoza/OPBS-PROJECT_ALPHA/tree/master/Research/Modular%20Tests/Stepper%20Drivers

Wifi

So what about the lack of networking on the Pi Zero?  Well I am already working in a USB Hub, I wonder if I can add a USB Wifi Adapter.  But lets make it super cool and add a footprint for one of these:  http://www.aliexpress.com/item/wifi-module-RTL8188EUS-RTL8188-NEW-ORIGINAL-2PCS-LOT/32240202795.html?spm=2114.031010208.3.20.STJZAx&ws_ab_test=searchweb201556_6_79_78_77_80,searchweb201644_5,searchweb201560_8  – a surface mountable Realtek Wifi NIC module?

PCB Design coming this Sunday!

I will post up preliminary board design by Sunday (On the road today and tomorrow, so being brief with this post to get it done rather quickly, instead of blogging…) – in the meantime, as always, I will open source the whole thing, including BOM so you can go ahead and make it for yourself or some friends. If you sell it, just remember you owe me some beer (:
If you would like to help with paying the prototyping costs, you can shoot me a donation on Paypal if you wish:
https://www.paypal.com/cgi-bin/webscr?cmd=_s-xclick&hosted_button_id=KC92Q2BJL4S7U&source=url – would be great since I need to order those USB Wifi modules, some TMC2660s, and a Pi Zero (;

#cnc, #grbl, #pi, #raspberry, #tinyg, #zero

New project: LaserWeb – a Node.JS based Lasercutter/Engraver frontend for machines converted to run on Marlin Firmware

So, you bought a chinese laser cutter…

BUY NOW: AliExpress.com 40W 300x200mm Desktop CO2 mini laser Engraver BUY NOW AliExpress.com (Ship from DE) High Quality 40W 200*300mm Mini CO2 Laser Engraver


First you spend a few weeks fixing the blatant safety flaws (door switches and the like) … only to get frustrated with Moshidraw and LaserDraw and all the other software that comes with it.

You start googling, you find out theres a lot of people who converted their K40 40w chinese lasers to run on RAMPS+Marlin.  For example https://github.com/ExplodingLemur/presentations/wiki/K40-RAMPS-Conversion

2015 - 1 (3)

PS: a note on using a RAMPS, sure that’s great and everything, but if you decide to follow this conversion, look at the stunning board I spun up to do that for you, tailored for lasers, better than using a RAMPS,  over on openbuilds.com, at http://openbuilds.org/threads/openbuilds-freeburn-2-mini-v-slot-co2-laser-40-50w.1112/page-4#post-16019


So you jump in, and do the hardware conversion.

Only to get thrown back under the bus with lots of new words like CAM, and Gcode, and svg, and dxf, inkscape plugins written in python and … well long story short – how the heck to I take my drawing and just cut it without having to go through tonnes of ‘cam workflows’ converting from one format to the other to the next to finally to gcode then use a 3D printer host to send gcode to my laser… and you lost focus halfway through that rant right?

So, I started a little project a few days ago, called LaserWeb.  To make running your Marlin based lasercutter (be it a converted K40, or a Diode laser, or a #FREEBURN2) as easy as it can get…

laserweb nov

For more information on this rapidly changing project, head over to https://github.com/openhardwarecoza/LaserWeb

Its designed to be simplistic:

Open a GCODE, SVG, DXF or MILLCRUM.com file and start cutting right away!

If you have feedback, issues or bugs, please report it at https://github.com/openhardwarecoza/LaserWeb/issues