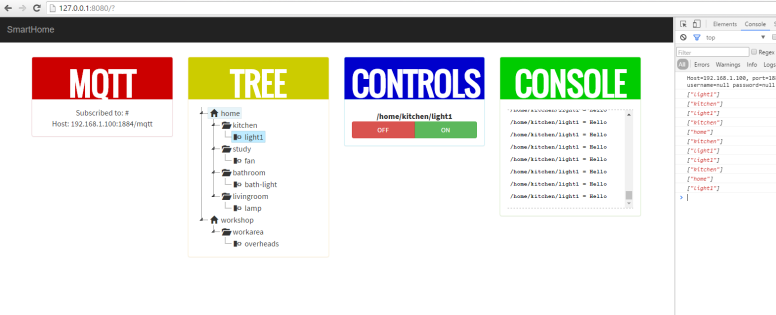
Nowhere near completely usable, BUT, what IS working so far:
Websocket javascript with Paho library subscribes succesfully to the Websocket listener on Mosquitto
I can subscribe, and recieve all the published messages on the HAB
I am using the data received, to dynamically, and automatically, build up a device tree – it looks at the topic path (remember how a year a ago I wrote a post about why the topic name is important (; – here you see why – from the topic names i can deduce the entire hierarchy automatically)
Clicking any item in the tree brings ip a CONTROL interface – to be extended with sensorvalues, etc
The basic concept here is working great – by setting my devices to announce themselves, or response to a broadcast requesting them to announce themselves, I can cut a LOT of configuration out – theoretically I can have a new device connect to MQTT, send the page its name, location, connected devices, what those devices are (switch, dimmer, sensor, or actuator) and the javascript can automagically make a UI for it. This means you can mostly get away without a server, without a database.
My home automation system has been running stable for well over a year, but the versions of the software in use have started to show age. For that matter, the hardware too. I have been using an old Cubieboard A10 board to run OpenHAB +Mosquitto on, and lately, its been needing a reboot every now and then to keep on working
The friendly folks at FabCreator.com donated a new Raspberry Pi 3 to the LaserWeb project, so with that upgrade, I now have a spare Raspberry Pi B+ available (no longer in use for LaserWeb development) so I decided to repurpose this old B+ into a new OpenHAB+Mosquitto server. Also, in the year or so since my last install, Mosquitto now comes with WebSocket support. This is something I REALLY want to play with – would help a lot for adding quick dashboards onto the HAB (Not HAB – as in Home Automation Bus… not OpenHAB – with WebSockets I can choose to listen in on the MQTT layer, and either just display updates, or also send MQTT messages to the broker, and in turn to the devices or the OpenHAB server. )
So, here we go:
1. I downloaded Rasbian Jessie from Raspberrypi.org
2. I burned it to an SD card with Win32DiskImager and booted up the Raspberry Pi B+
3. Next, I configured a static IP, and did some standard setup (expand filesystem, allocate memory for headless use, overclock to medium, etc)
Install Mosquitto with WebSocket Support
The version of Mosquitto in the RPi repos doesnt support Websockets, so first we need to add a Repo from mosquitto.org, then install Mosquitto
Note: At the time of writing this gave me Mosquitto version 1.4.9 (build date Fri, 03 Jun 2016 09:02:12 +0100)
Enable Websocket Support
Open the Mosquitto config in your favourite editor
sudo nano /etc/mosquitto/mosquitto.conf
By default, mosquitto comes without any listeners. We want to add two listeners: one standard MQTT protocol listener on port 1883, and a second listener on port 1884 (for the Websocket protocol)
Your config file should look something like this: Once done, save and exit.
Restart mosquitto:
sudo service mosquitto restart
If you want to confirm that worked, run:
sudo netstat -nlp | grep mosquitto
As you can see in the screenshot above, both :1883 and :1884 are listening (:
Now, if you are anything like me, you’re probably anxious to test that newfound feature first right? Lets test that Websocket Connection!
But i’m also lazy, so lets test it without a single line of code (;
On the ESP8266: Install the following sketch using Arduino ( Note I won’t go into detail on setting up Arduino for ESP8266, lots of articles on the Internet already explain that)
NB: Do make sue you install the MQTT library: https://github.com/knolleary/pubsubclient
/*
 Basic ESP8266 MQTT example

 This sketch demonstrates the capabilities of the pubsub library in combination
 with the ESP8266 board/library.

 It connects to an MQTT server then:
  - publishes "hello world" to the topic "outTopic" every two seconds
  - subscribes to the topic "inTopic", printing out any messages
    it receives. NB - it assumes the received payloads are strings not binary
  - If the first character of the topic "inTopic" is an 1, switch ON the ESP Led,
    else switch it off

 It will reconnect to the server if the connection is lost using a blocking
 reconnect function. See the 'mqtt_reconnect_nonblocking' example for how to
 achieve the same result without blocking the main loop.

 To install the ESP8266 board, (using Arduino 1.6.4+):
  - Add the following 3rd party board manager under "File -> Preferences -> Additional Boards Manager URLs":
       http://arduino.esp8266.com/stable/package_esp8266com_index.json
  - Open the "Tools -> Board -> Board Manager" and click install for the ESP8266"
  - Select your ESP8266 in "Tools -> Board"

*/

#include <ESP8266WiFi.h>
#include <PubSubClient.h>

// Update these with values suitable for your network.

const char* ssid = "openhardwarecoza";
const char* password = "novell1234";
const char* mqtt_server = "192.168.1.13";
int counter = 0;
int previousReading = LOW;


WiFiClient espClient;
PubSubClient client(espClient);
long lastMsg = 0;
char msg[50];
int value = 0;

void setup_wifi() {

  delay(10);
  // We start by connecting to a WiFi network
  Serial.println();
  Serial.print("Connecting to ");
  Serial.println(ssid);

  WiFi.begin(ssid, password);

  while (WiFi.status() != WL_CONNECTED) {
    delay(500);
    Serial.print(".");
  }

  Serial.println("");
  Serial.println("WiFi connected");
  Serial.println("IP address: ");
  Serial.println(WiFi.localIP());
}

void callback(char* topic, byte* payload, unsigned int length) {
  Serial.print("Message arrived [");
  Serial.print(topic);
  Serial.print("] ");
  for (int i = 0; i < length; i++) {
    Serial.print((char)payload[i]);
  }
  Serial.println();

  // Switch on the LED if an 1 was received as first character
  if ((char)payload[0] == '1') {
    digitalWrite(BUILTIN_LED, LOW);   // Turn the LED on (Note that LOW is the voltage level
    // but actually the LED is on; this is because
    // it is acive low on the ESP-01)
  } else {
    digitalWrite(BUILTIN_LED, HIGH);  // Turn the LED off by making the voltage HIGH
  }

}

void reconnect() {
  // Loop until we're reconnected
  while (!client.connected()) {
    Serial.print("Attempting MQTT connection...");
    // Attempt to connect
    if (client.connect("ESP8266Client")) {
      Serial.println("connected");
      // Once connected, publish an announcement...
      client.publish("outTopic", "hello world");
      // ... and resubscribe
      client.subscribe("inTopic");
    } else {
      Serial.print("failed, rc=");
      Serial.print(client.state());
      Serial.println(" try again in 5 seconds");
      // Wait 5 seconds before retrying
      delay(5000);
    }
  }
}

void setup() {
  pinMode(BUILTIN_LED, OUTPUT);     // Initialize the BUILTIN_LED pin as an output
  Serial.begin(115200);
  setup_wifi();
  client.setServer(mqtt_server, 1883);
  client.setCallback(callback);
  pinMode(12, INPUT);
}

void loop() {

  if (!client.connected()) {
    reconnect();
  }
  client.loop();
  int reading = digitalRead(12);
  Serial.println(reading);
  if (previousReading == LOW && reading == HIGH) {
    counter++;
    client.publish("outTopic", "Motion Detected");
    Serial.print("Triggered ");
    Serial.print(counter);
    Serial.print("x Times! ");
    delay(1000);

  }
  previousReading = reading;

}
Wiring
Connect VCC on the IR Sensor to 5v (NB it has an onboard 3.3v regulator, so the output voltage is 3.3v (safe for ESP) but it needs to be powered off 5v!)
Connect Signal to pin 12 on the ESP8266 (or change the Arduino code to the pin where you wired it to)
Connect GND to GND
A friend of mine (or am I being too forward?) suggested in the comment thread on Google Plus that adding Wifi/Bluetooth to SmoothieBrainz would be a good idea:
sudo vi /opt/openhab/configurations/sitemaps/dolphin.sitemap
and add it like:
Switch item=Toggle label="Toggle"
Next, we need to create a rule to manage this toggling action into HTTP requests:
sudo vi /opt/openhab/configurations/rules/httpreq.rules
and inside this file I add two rules, one to catch the ON and one to catch the OFF:
rule updateToggleOn
when
 Item Toggle received command ON
then
 sendHttpGetRequest("http://192.168.1.5/?pin=ON")
end
rule updateToggleOff
when
 Item Toggle received command OFF
then
 sendHttpGetRequest("http://192.168.1.5/?pin=OFF")
end
Now, in this case the device I am controlling is a simple ESP8266 WebApp from https://github.com/nodemcu/nodemcuirmware/blob/master/lua_examples/webap_toggle_pin.lua to demonstrate the idea to Michael. Since its this simple sketch, you can expect a cosmetic error to popup in openhab.log:
05:37:12.169 ERROR o.openhab.io.net.http.HttpUtil[:230]- Fatal protocol violation: org.apache.commons.httpclient.ProtocolException: The server 192.168.1.5 failed to respond with a valid HTTP response
The ESP8266 sketch doesnt return a valid HTTP header. No worries though, ignore the error – it still works!
So, the above example takes care of a device needing an “on” and “off” …
But what about a a “toggle” or “momentary” button (Garage door opener for example?)
Easy: One simple change in the Items file and one less rule:
Schematics, Board and Gerbers are released as open source hardware under a CC-BY-SA licence and you can find it on my GitHub repo at https://github.com/openhardwarecoza/esp8266-PROJECTS/tree/master/ESP8266-%204%20channel%20mosfet%20switch
New to what we’ve done so far, we need to add a Rule as well into a new file under /opt/openhab/configuration/rules/dolphin.rules for example.
This rule takes the inputs from the Item above and transforms it into RGB values to send over MQTT
import org.openhab.core.library.types.*

var HSBType hsbValue
var int redValue
var int greenValue
var int blueValue
var String RGBvalues

rule "Set RGB 2 value"
 when
 Item fWIFI_RGB_2 changed
 then
 hsbValue = fWIFI_RGB_2.state as HSBType

 redValue = hsbValue.red.intValue
 greenValue = hsbValue.green.intValue
 blueValue = hsbValue.blue.intValue


 RGBvalues= redValue.toString + ";" + greenValue.toString + ";" + blueValue.toString
 sendCommand( WIFI_RGB_2_RGB, RGBvalues )

 logInfo( "fWIFI_RGB_2", RGBvalues )
end
Note: Based off code written by Andreas Holldorfer (http://chaozlabs.blogspot.co.za/2015/08/esp8266-in-wild-wifi-led-controller-hack.html) but adapted to my own PCBs
I made a few changes to the m:on(“offline”) function to handle failed Wifi connections better.
I had a few issues where my wifi router restarted, upon restarting (with the old sketch on the ESP07) once the wifi was back up, it reconnected to the Wifi though the magic of NodeMCU’s wifi.sta.autoconnect(1) functionality. However despite the Wifi reconnecting, the MQTT stopped working.
I added a new function called reconnect() to handle the dropped connection. It sets up a timer action to check when the Wifi is up again (Status = 5 and IP is not = null) then reruns the MQTT connect/subscribe:
function reconnect()
 print ("Waiting for Wifi")
 if wifi.sta.status() == 5 and wifi.sta.getip() ~= nil then
 print ("Wifi Up!")
 tmr.stop(1)
 m:connect(Broker, 1883, 0, function(conn)
 print("Mqtt Connected to:" .. Broker)
 mqtt_sub() --run the subscription function
 end)
 end
 end
Here’s the full sketch now
Elegant reconnect after wifi fails
7 channels
/dev1/ch1-7 mqtt names
-- One time ESP Setup --
wifi.setmode(wifi.STATION)
wifi.sta.config ( "openhardwarecoza" , "novell1234" )
print(wifi.sta.getip())


 Broker="192.168.1.200"
 --GPIO2 is connected to LED via resistor, initially off
 gpio.mode(1,gpio.OUTPUT)
 gpio.write(1,gpio.LOW)
 gpio.mode(2,gpio.OUTPUT)
 gpio.write(2,gpio.LOW)
 gpio.mode(3,gpio.OUTPUT)
 gpio.write(3,gpio.LOW)
 gpio.mode(4,gpio.OUTPUT)
 gpio.write(4,gpio.LOW)
 gpio.mode(5,gpio.OUTPUT)
 gpio.write(5,gpio.LOW)
 gpio.mode(6,gpio.OUTPUT)
 gpio.write(6,gpio.LOW)
 gpio.mode(7,gpio.OUTPUT)
 gpio.write(7,gpio.LOW)

 function reconnect()
 print ("Waiting for Wifi")
 if wifi.sta.status() == 5 and wifi.sta.getip() ~= nil then
 print ("Wifi Up!")
 tmr.stop(1)
 m:connect(Broker, 1883, 0, function(conn)
 print("Mqtt Connected to:" .. Broker)
 mqtt_sub() --run the subscripion function
 end)
 end
 end
 m = mqtt.Client("KITCHEN", 180, "user", "password")
 m:lwt("/lwt", "ESP8266", 0, 0)
 m:on("offline", function(con)
 print ("Mqtt Reconnecting...")
 tmr.alarm(1, 10000, 1, function()
 reconnect()
 end)
 end)


 -- on publish message receive event
 m:on("message", function(conn, topic, data)
 print("Recieved:" .. topic .. ":" .. data)

 if (data=="ON") and (topic=="/dev1/ch1/com") then
 print("Enabling Output")
 gpio.write(1,gpio.HIGH)
 m:publish("/dev1/ch1/state","ON",0,0)
 elseif (data=="OFF") and (topic=="/dev1/ch1/com") then
 print("Disabling Output")
 gpio.write(1,gpio.LOW)
 m:publish("/dev1/ch1/state","OFF",0,0)
 elseif (data=="ON") and (topic=="/dev1/ch2/com") then
 print("Enabling Output")
 gpio.write(2,gpio.HIGH)
 m:publish("/dev1/ch2/state","ON",0,0)
 elseif (data=="OFF") and (topic=="/dev1/ch2/com") then
 print("Disabling Output")
 gpio.write(2,gpio.LOW)
 m:publish("/dev1/ch2/state","OFF",0,0)
 elseif (data=="ON") and (topic=="/dev1/ch3/com") then
 print("Enabling Output")
 gpio.write(3,gpio.HIGH)
 m:publish("/dev1/ch3/state","ON",0,0)
 elseif (data=="OFF") and (topic=="/dev1/ch3/com") then
 print("Disabling Output")
 gpio.write(3,gpio.LOW)
 m:publish("/dev1/ch3/state","OFF",0,0)
 elseif (data=="ON") and (topic=="/dev1/ch4/com") then
 print("Enabling Output")
 gpio.write(4,gpio.HIGH)
 m:publish("/dev1/ch4/state","ON",0,0)
 elseif (data=="OFF") and (topic=="/dev1/ch4/com") then
 print("Disabling Output")
 gpio.write(4,gpio.LOW)
 m:publish("/dev1/ch4/state","OFF",0,0)
 elseif (data=="ON") and (topic=="/dev1/ch5/com") then
 print("Enabling Output")
 gpio.write(5,gpio.HIGH)
 m:publish("/dev1/ch5/state","ON",0,0)
 elseif (data=="OFF") and (topic=="/dev1/ch5/com") then
 print("Disabling Output")
 gpio.write(5,gpio.LOW)
 m:publish("/dev1/ch5/state","OFF",0,0)
 elseif (data=="ON") and (topic=="/dev1/ch6/com") then
 print("Enabling Output")
 gpio.write(6,gpio.HIGH)
 m:publish("/dev1/ch6/state","ON",0,0)
 elseif (data=="OFF") and (topic=="/dev1/ch6/com") then
 print("Disabling Output")
 gpio.write(6,gpio.LOW)
 m:publish("/dev1/ch6/state","OFF",0,0)
 elseif (data=="ON") and (topic=="/dev1/ch7/com") then
 print("Enabling Output")
 gpio.write(7,gpio.HIGH)
 m:publish("/dev1/ch7/state","ON",0,0)
 elseif (data=="OFF") and (topic=="/dev1/ch7/com") then
 print("Disabling Output")
 gpio.write(7,gpio.LOW)
 m:publish("/dev1/ch7/state","OFF",0,0)
 end
 end)


 function mqtt_sub()
 m:subscribe("/dev1/#",0, function(conn)
 print("Mqtt Subscribed to OpenHAB feed for device KITCHEN")
 end)
 end

 tmr.alarm(0, 1000, 1, function()
 print ("Connecting to Wifi... ")
 if wifi.sta.status() == 5 and wifi.sta.getip() ~= nil then
 print ("Wifi connected")
 tmr.stop(0)
 m:connect(Broker, 1883, 0, function(conn)
 print("Mqtt Connected to:" .. Broker)
 mqtt_sub() --run the subscription function
 end)
 end

 end)


![05:37:12.169 ERROR o.openhab.io.net.http.HttpUtil[:230]- Fatal protocol violation: org.apache.commons.httpclient.ProtocolException: The server 192.168.1.5 failed to respond with a valid HTTP response](https://openhardwarecoza.files.wordpress.com/2015/10/httpvalid.png)


